A view on the interface is the entity that takes up the rectangular area of the interface or the screen. View handles the event handling along with the drawing. In Android, View is a specific class that is designated as a superclass, as it is solely responsible for the GUI components within the Android framework. In simple words, it is the base class for all the widgets that are used to create the UI controls. If you are looking to create a UI control or widget, you need to define the view first. As an Android developer, there will be different types of view we will be using. Some of them are listed below.
Once the adapter is declared, we can add the following code for declaring the ListView and accessing the declared array in the adapter.
A comprehensive code in XML format will look like this.
In the code above, the string containing different colors is declared for the data adapter. The adapter feeds the information to the ListView, and the user gets the option to select the colors.
The custom view is a boon on the Android platform, for the developers. With custom views, we can create reusable views on the Android platform. Moreover, these types of views can be used as specific widgets on Android. Apart from reusability, we might need custom views when we want to provide some additional capability to a widget.
When we are discussing views, there are some key facts we need to consider. At the first step, the onMeasure() function is called up for the measurement of the UI, from top to bottom. The measurement is done in a sequence, first, it is the container of the parents, then the children, and then the rest. In the second step, onLayout() function is called for plotting the positions of the proposed widget. In the last step, rendering happens with onDraw() function.
If we are looking to create a custom view, then it can be done in two specific ways. First, by extending a pre-existing widget class. Secondly, by extending the “View” Class.
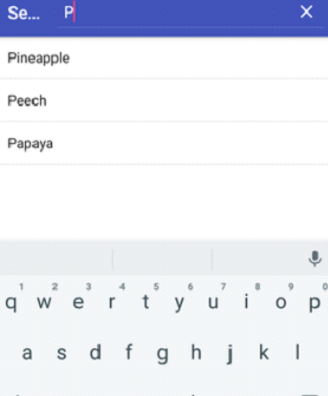
SearchView is a widget within the Android platform where you can enter a search string, to execute a search. Once the search query string is entered in the search view widget, it is submitted to the search provider, such as Google and Bing. Once submitted, it returns the result allowing the user to select any one of them.
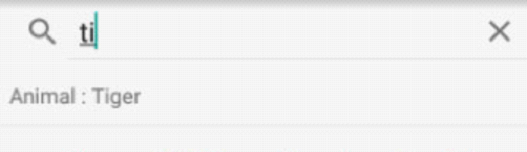
While the user, enters the string, automatic suggestions will appear allowing the user to select to complete the search.
A simple SearchView widget can be created with the code given below.
SearchView can be also implemented over the actionbar and the toolbar. In some applications toolbar and the actionbar can be the same. An example of this is shown below.
The Scrollview in Android allows adding the horizontal or vertical scrollbars on the interface. These scrollbars are larger than the actual layout, which allows them to slide vertically or horizontally. Getting Scrollview is required, in case the content on the interface doesn’t fit the size of the layout, and the users need to scroll to view the complete content. In one layout we can have only one scrollview control, for multiple views we need different layouts. We can use layouts in Android like framelayout or relative layout. Scrollview can support only the vertical mode of scrolling by default, for Horizontal scrolling we have to use the HorizontalScrollView component.
Android provides the option of hiding a particular view by setting the visibility. The can be done by programming Kotlin or creating a code in XML. Through programming, we can manipulate the setVisibility(int) function, that can hide a view and show the view as per the given condition. The show view or hide view is done through animation. If we want to make the view visible or hide it, we can simply use the following code.
Visible attribute will make the view visible, while the Gone attribute will make it disappear.
|
|